Exploring ML Tools - Amazon Forecast
Posted on Thu 21 May 2020 in blogs
This post will focus on forecasting services offered by Amazon Web Service called as AWS Forecast. Companies have been performing forecast on business outcome since long time spanning from financial market forecast to retail product demand forecast. Earlier Statistical methods and Advanced Mathematics have been used to predict the future outcomes, however, with advancement of machine learning and available of big data, we are able to use deep learning techniques to make accurate predictions.
Introduction
In basic, forecasting is the method of predicting future based on past and present data. It consists of a model to which we feed historical time-based data y and we get future value of y. For example, we have model to predict future value of a stock then, we would feed historical data of stock to it and we will get the predicted value of the stock.
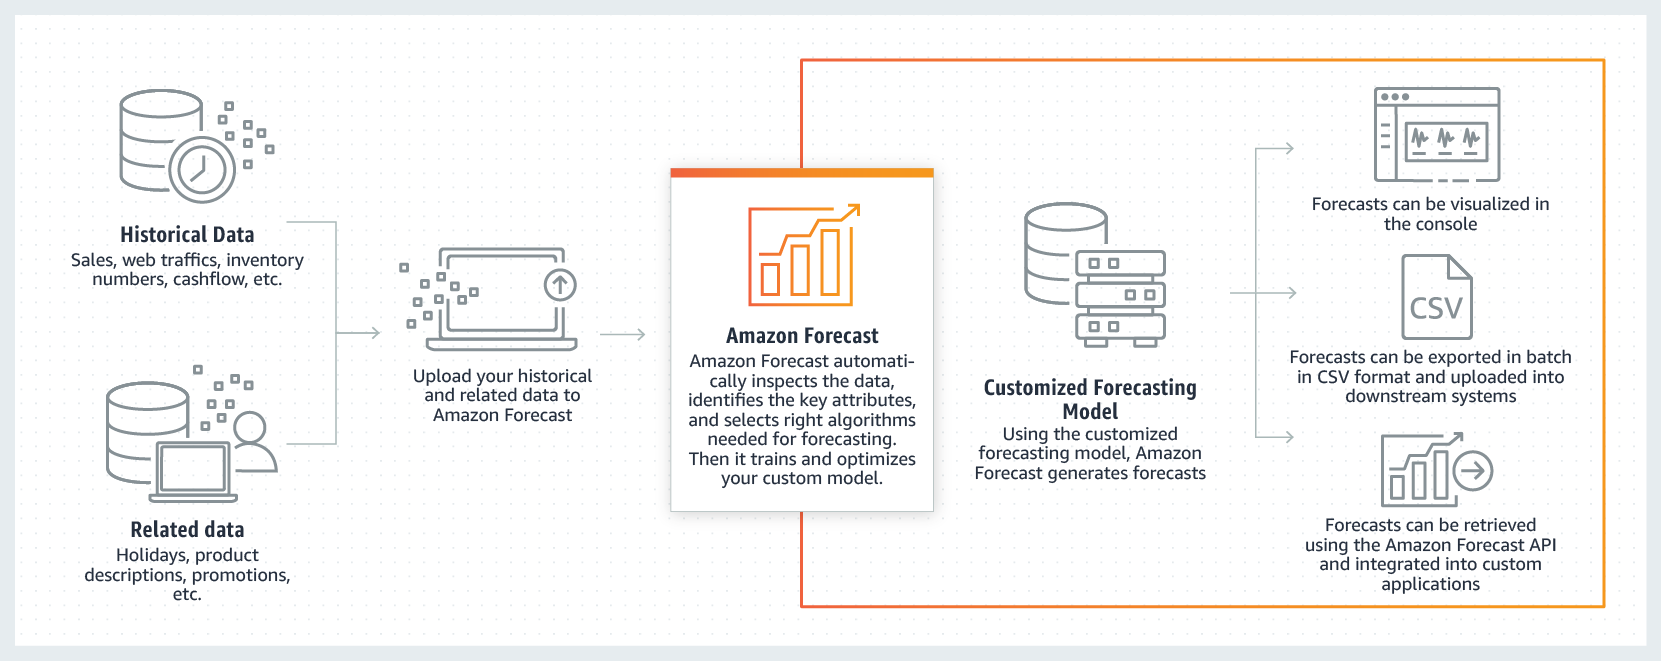
AWS Forecast is a managed service which provides the platform to users for running the forecasting on their data without the need to maintain the complex ML infrastructure. It is based on DeepAR+ algorithm which is supervised algorithm for forecasting one-dimensional time series using Recurrent Neural Networks.
It involves datasets which is used to train predictors and generate forecasts.
How it Works?
It consists of,
* Dataset and Dataset Groups
* You create Dataset Group and a Forecasting domain(Retail/Inventory Planning/Custom/..) based on your usecase.
The complete list can be found here
*  * Each dataset group can have three datasets, one of each type:
* target time series(required)
* related time series(optional)
* item metadata(optional) - only used when algorithm used is DeepAR+
*
* Each dataset group can have three datasets, one of each type:
* target time series(required)
* related time series(optional)
* item metadata(optional) - only used when algorithm used is DeepAR+
*  * You will have to select the frequency of your data. For example, in energy meter, we might take reading every 30 minutes.
* Following columns have to be mandatory present in target and related time series:
*
* You will have to select the frequency of your data. For example, in energy meter, we might take reading every 30 minutes.
* Following columns have to be mandatory present in target and related time series:
* timestamp (must be of timestamp type)
* item_id (must be of string type)
* Data type of all other columns must be of type string.
*  * Target time series must also contain
 target_value column, which is the column you are planning to forecast.
-
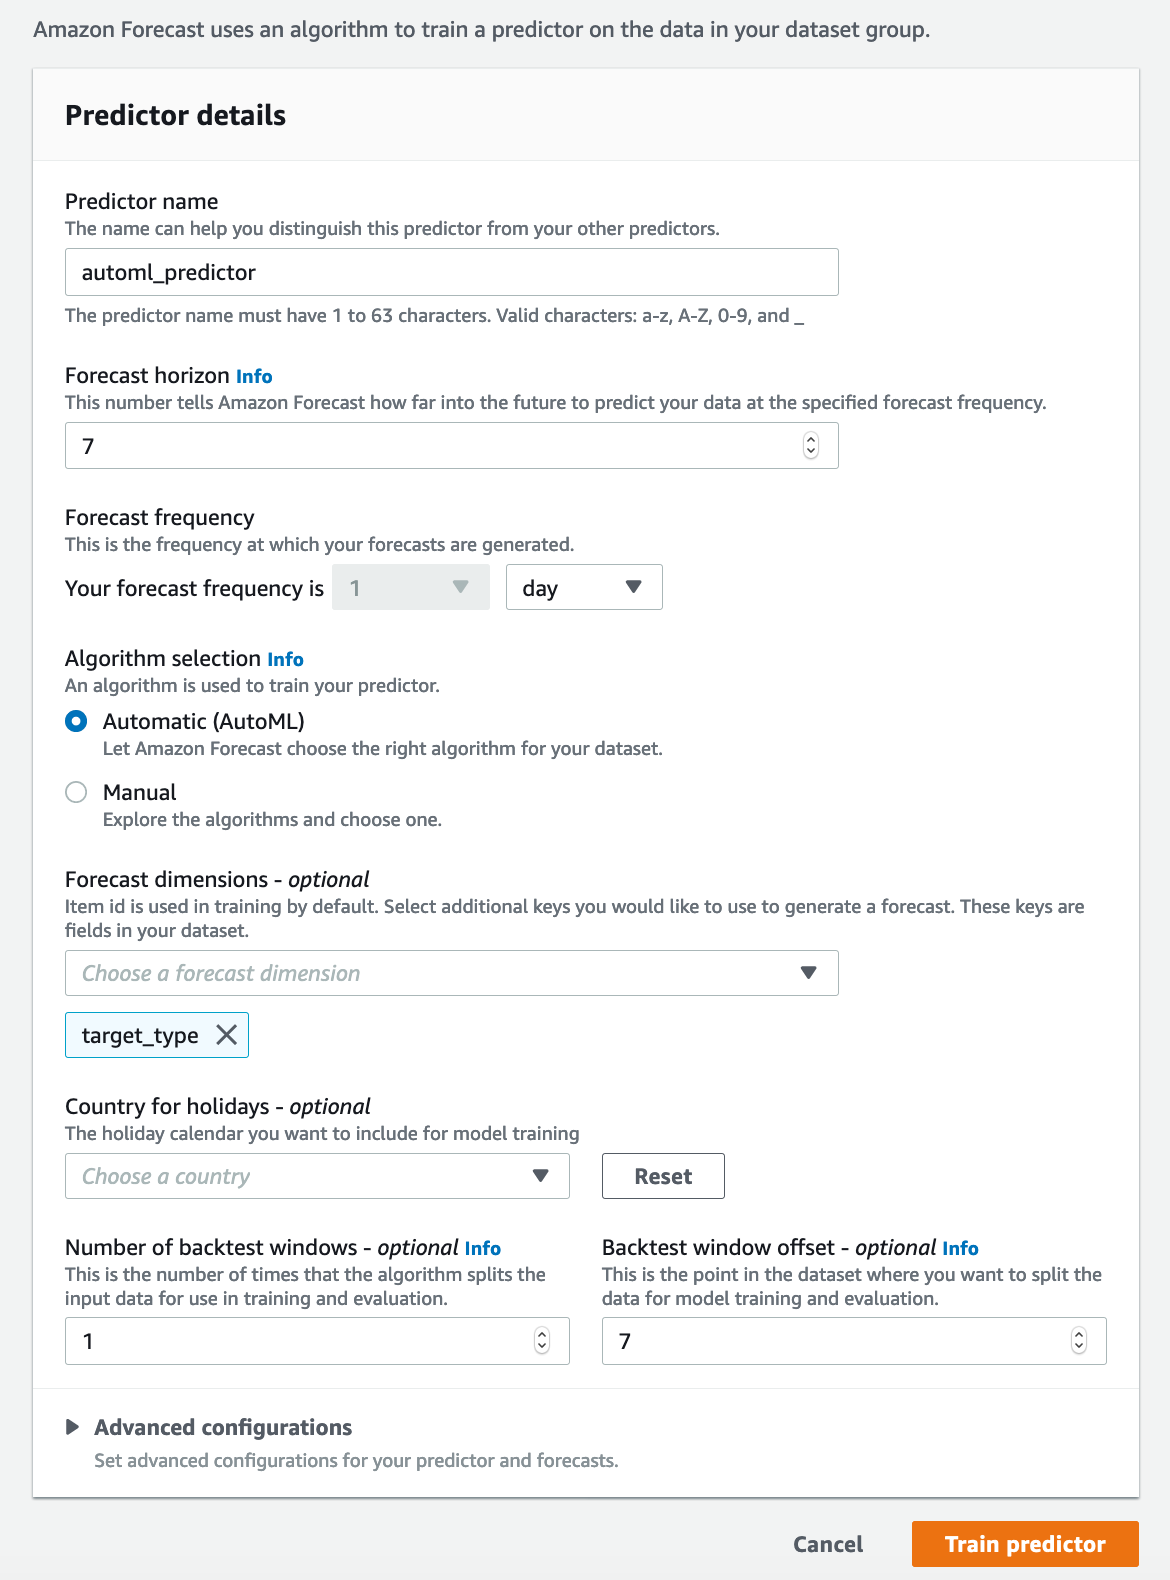
Predictors
- It creates trained model which is called as predictors.
- Users select Forecast horizon, which indicates how far you want to predict.
- One can manually select algorithm or select AutoML feature for automatic algorithm selection.
- There are some additional features available for fine tuning the forecasts.
-
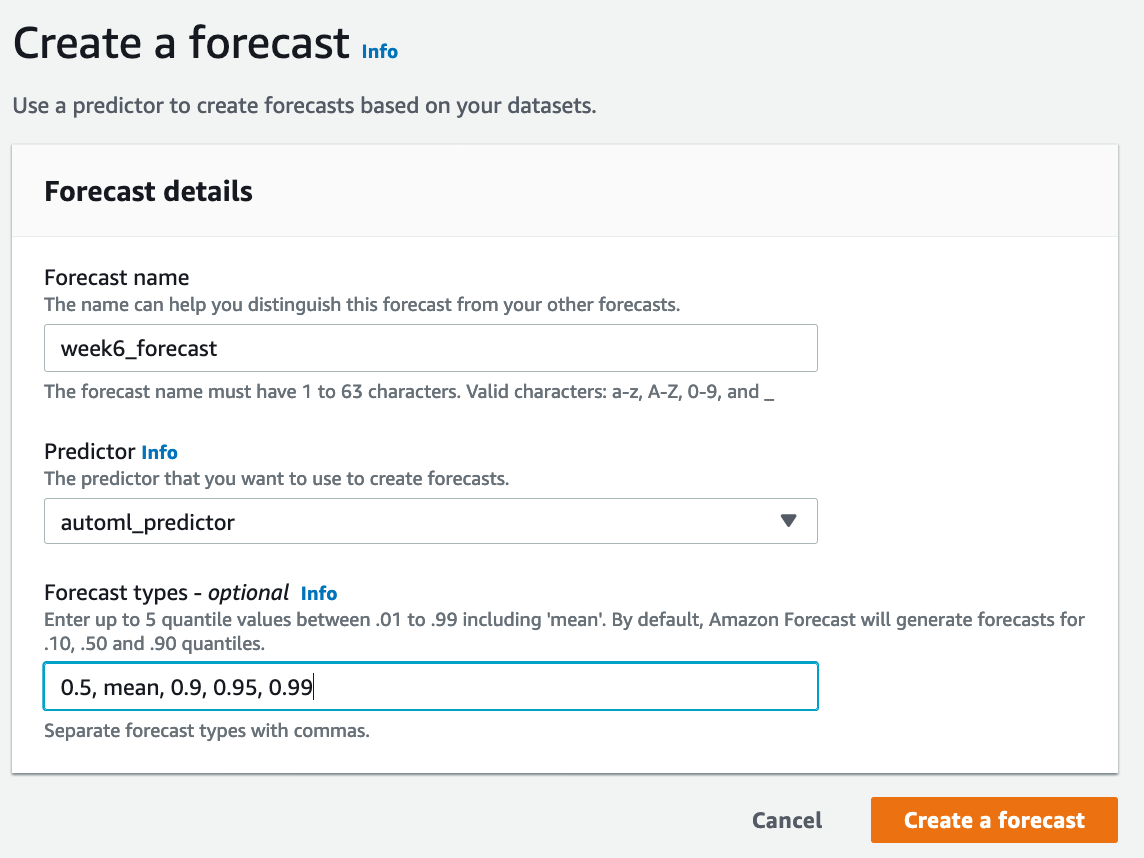
Forecasts
- We can create forecast on the predictor which is created above.
- You can select up to 5 quantile value including mean. You can choose based on your business need which can be either under-forecasting or over-forecasting. For example, 0.05 quantile means, the true data is expected to be lower than predicted data 5% of time. If we take example of predicting pandemic and number of cases, we would want quantile to be 0.99 for predicting hospital bed, because we don't want to under-forecast the resources in this scenario.
-
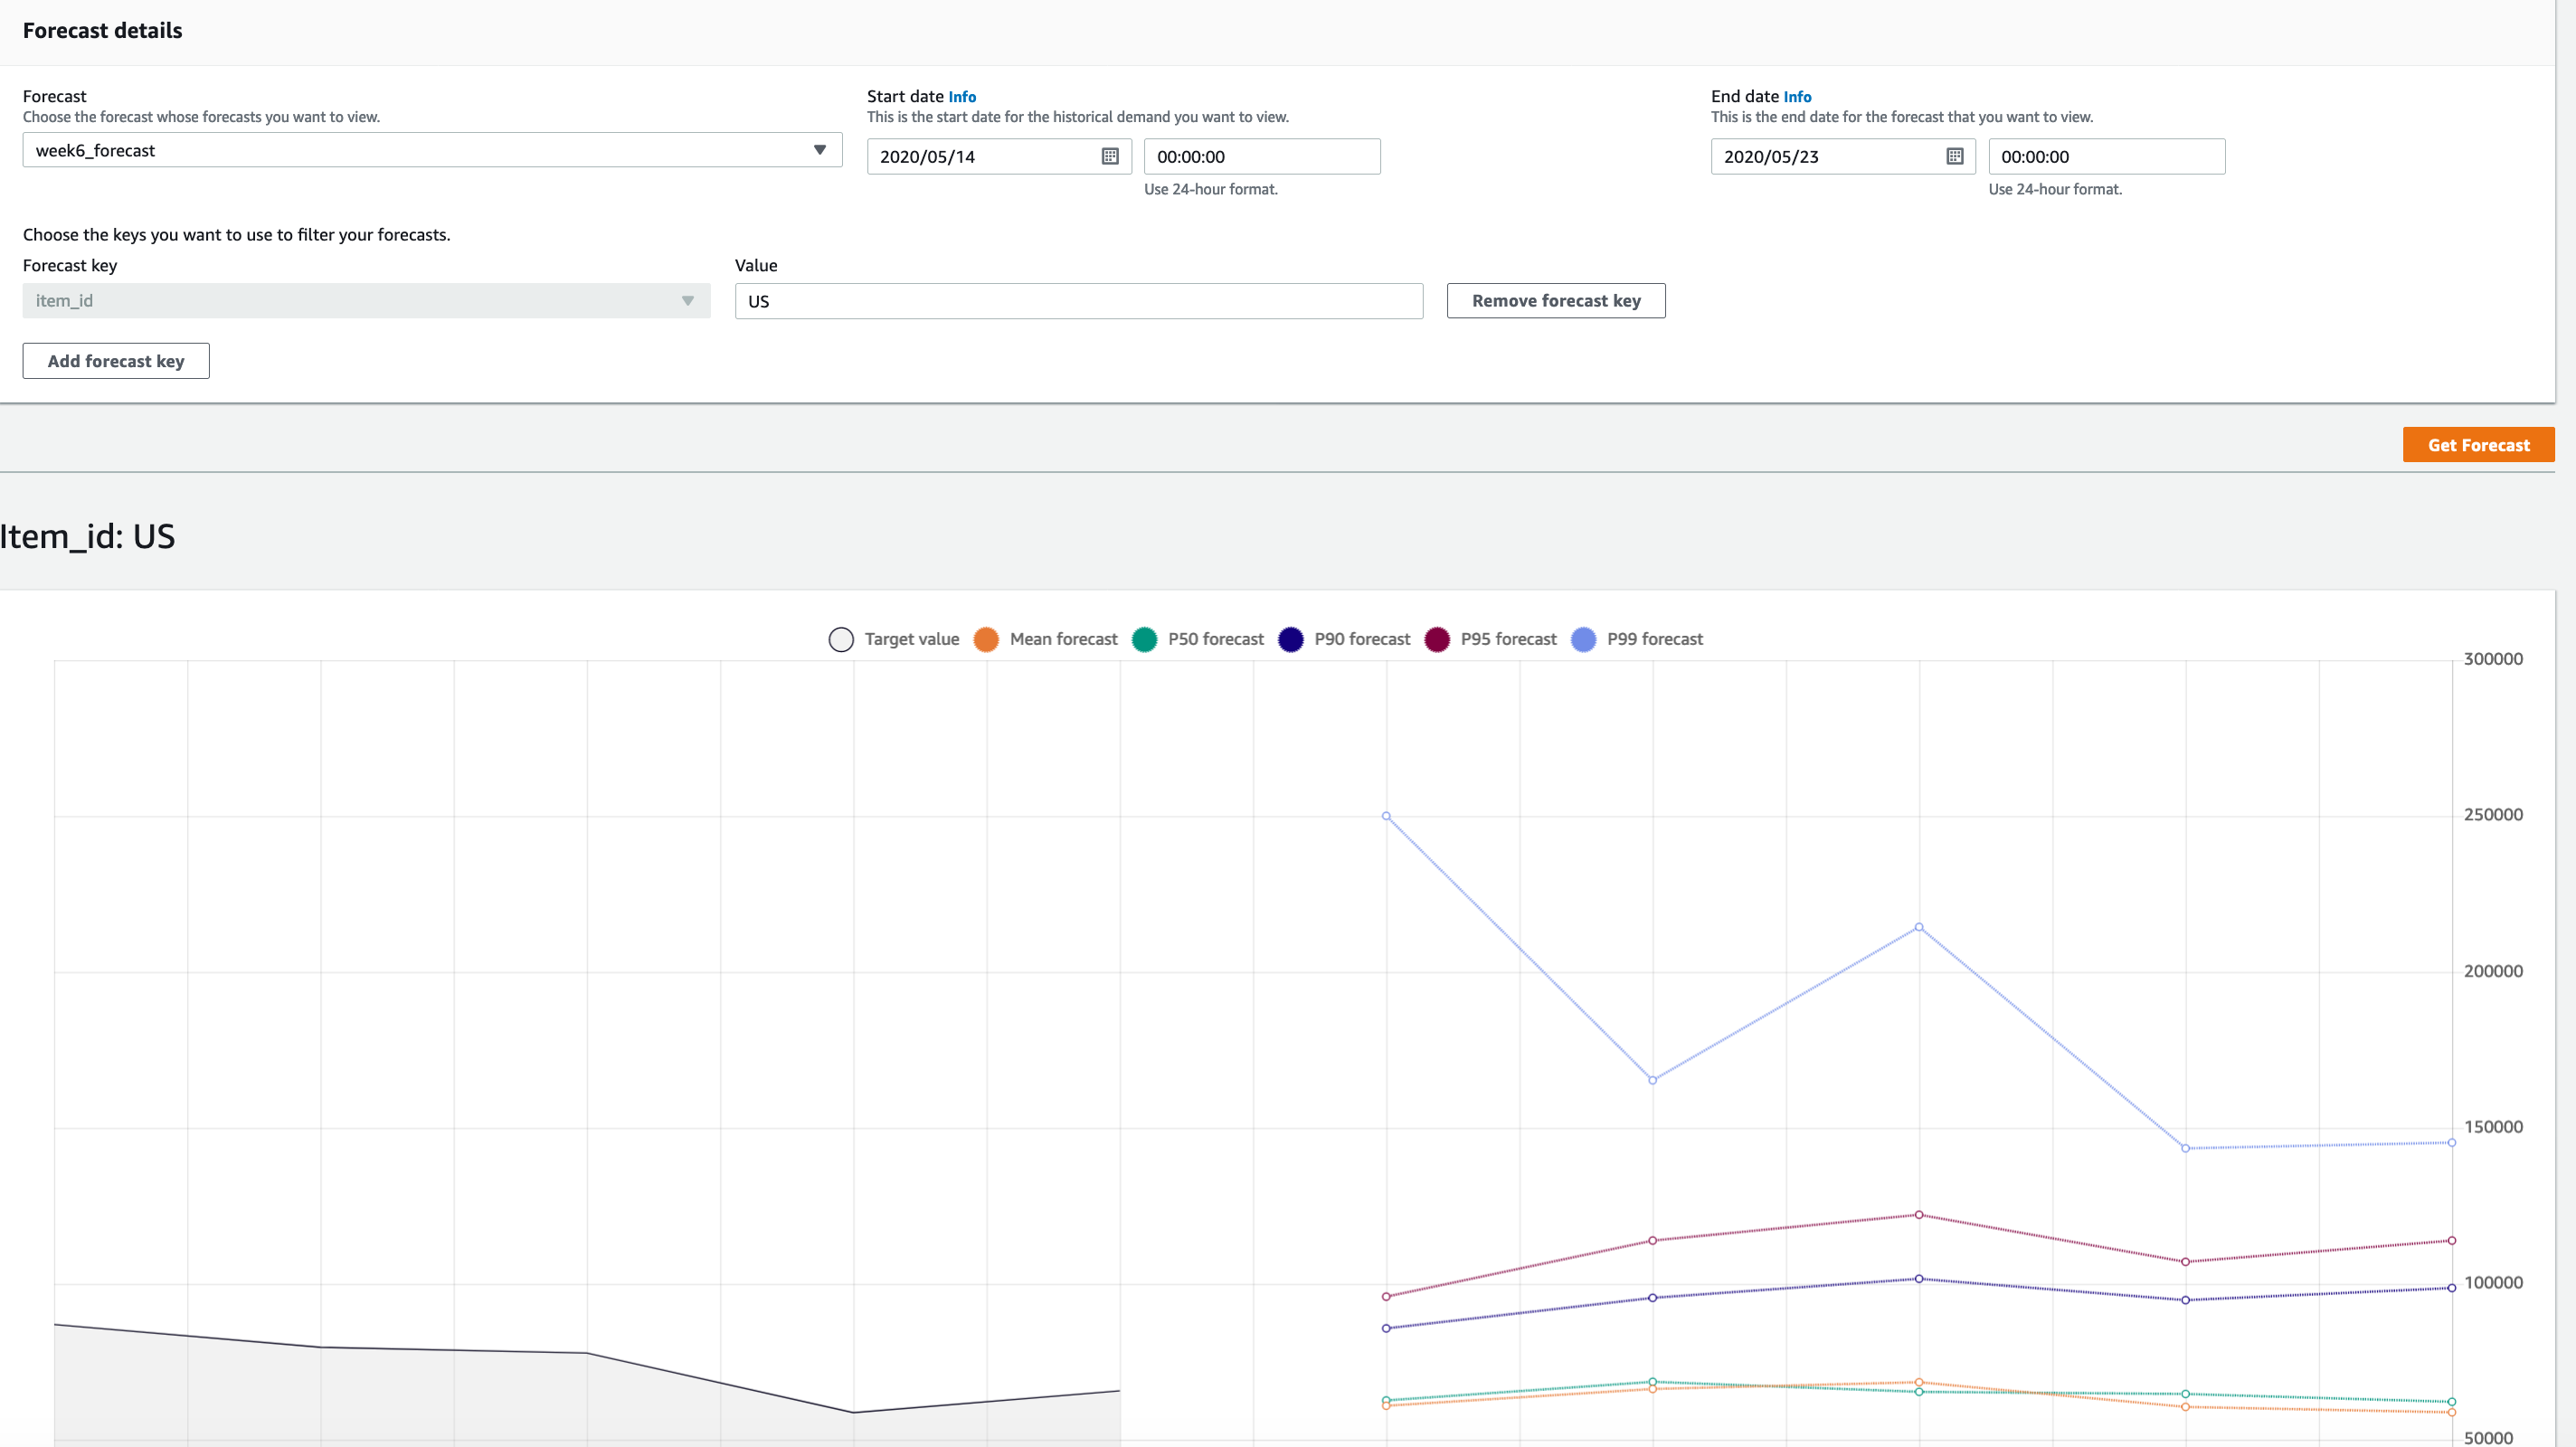
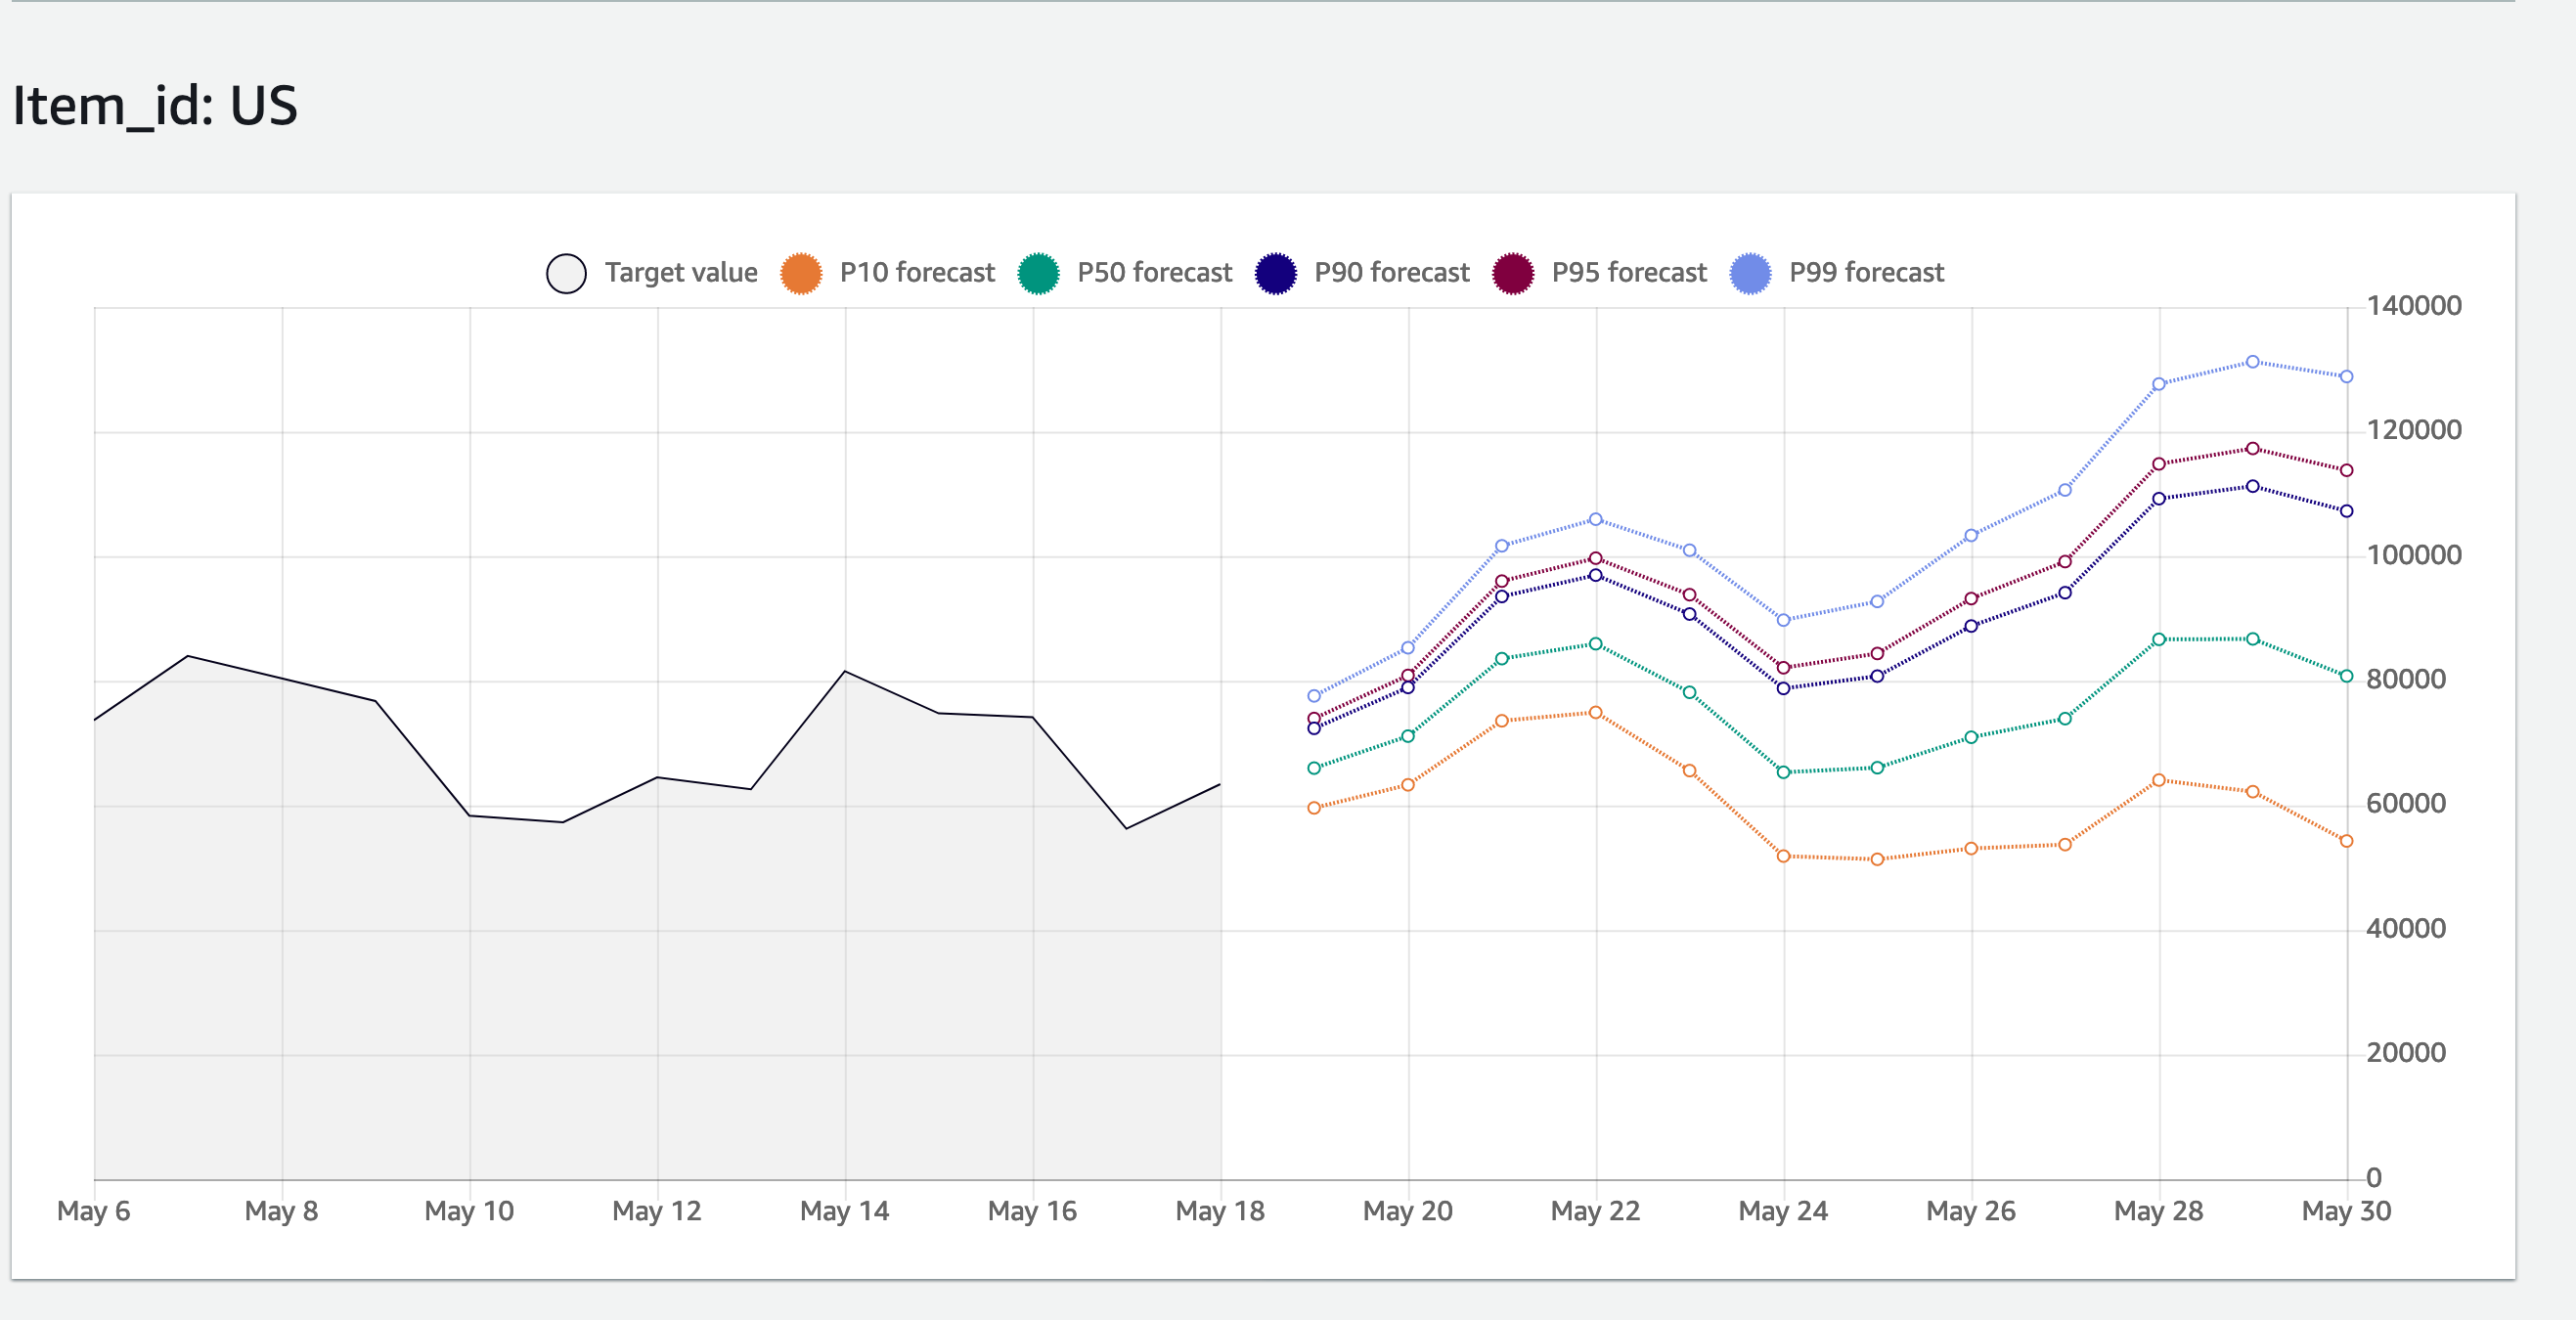
Forecast Lookup
- We can lookup in the console itself as shown in following screen shot.
Features
- Automatically identifies key attributes for forecasting.
- Manual Algorithm selection: DeepAR+, ARIMA, Prophet, Exponential Smoothing (ETS), Non-Parametric Time Series (NPTS). The detail list can be found here.
- Provide AutoML option for model training which automates complex tasks(algorithm selection, hyperparameter tuning, etc).
- Automatically fill missing values for target and related time series.
Usecase
Following are some usecases for AWS Forecast:
- Estimating product demand.
- Forecasting weather.
- Predicting web traffic.
- Estimating pandemic cases.
Usage
The forecast can be used via: * AWS cli * AWS Console * AWS SDK
Input
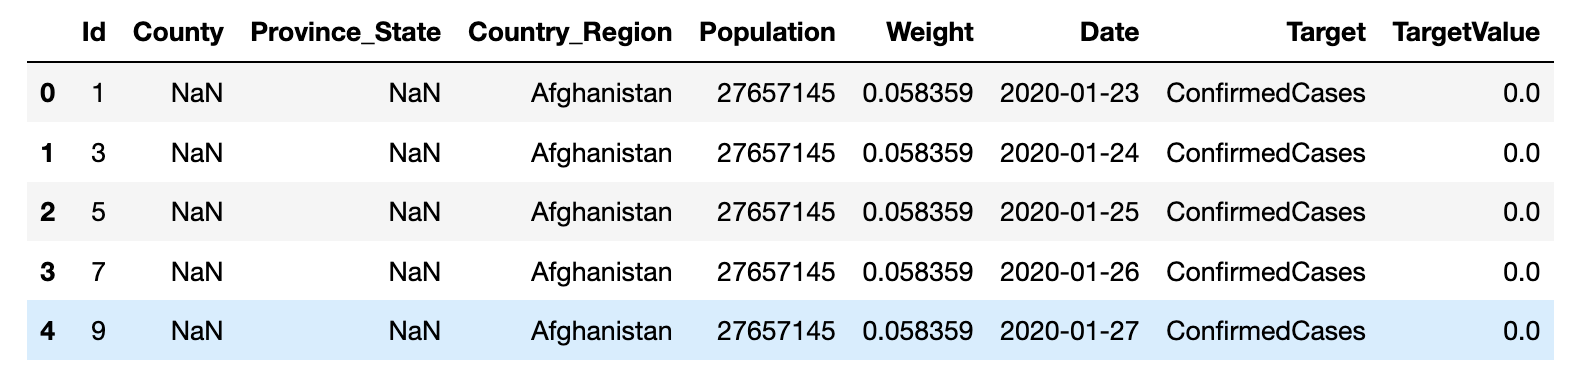
We will be using data of covid19 cases available on kaggle.
Following is the screenshot of sample data.
The schema needs to be adapted based on AWS forecast requirement and thus following is the schema for it,
{"Attributes": [{"AttributeName": "id", "AttributeType": "string"},
                {"AttributeName": "County", "AttributeType": "string"},
                {"AttributeName": "Province_State", "AttributeType": "string"},
                {"AttributeName": "item_id", "AttributeType": "string"},
                {"AttributeName": "Population", "AttributeType": "string"},
                {"AttributeName": "Weight", "AttributeType": "string"},
                {"AttributeName": "timestamp", "AttributeType": "timestamp"},
                {"AttributeName": "ConfirmedCases", "AttributeType": "string"},
                {"AttributeName": "target_value", "AttributeType": "float"}]
}
We will be forecasting Confirmed Cases for various countries which is named as item_id.
Process
Following steps will describe the forecasting using python sdk.
- Initializing AWS forecast client
import boto3

# Creating client to access forecast
forecast_client = boto3.client('forecast', region_name='eu-west-1')
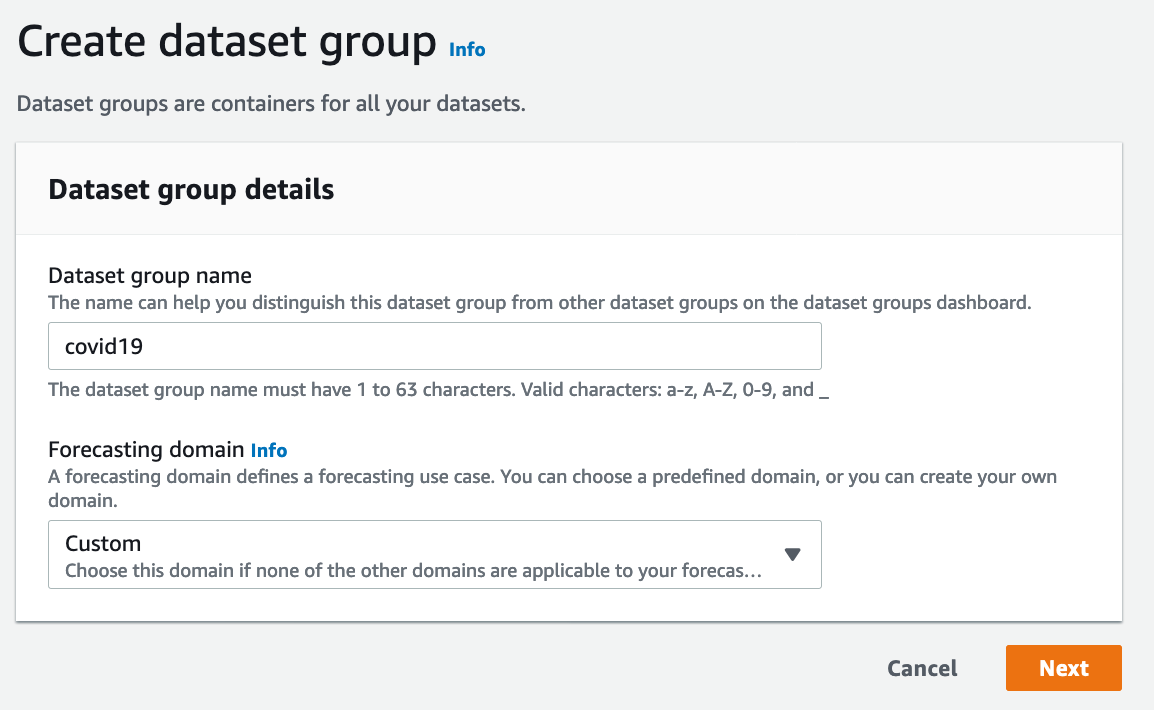
- Creating Dataset group
We will be creating dataset group with name as covid19.
dataset_group_name = "covid19_week5"
forecast_domain = "CUSTOM"

# Creating dataset group
dataset_group_response = forecast_client.create_dataset_group(
    DatasetGroupName=dataset_group_name,
    Domain=forecast_domain
)
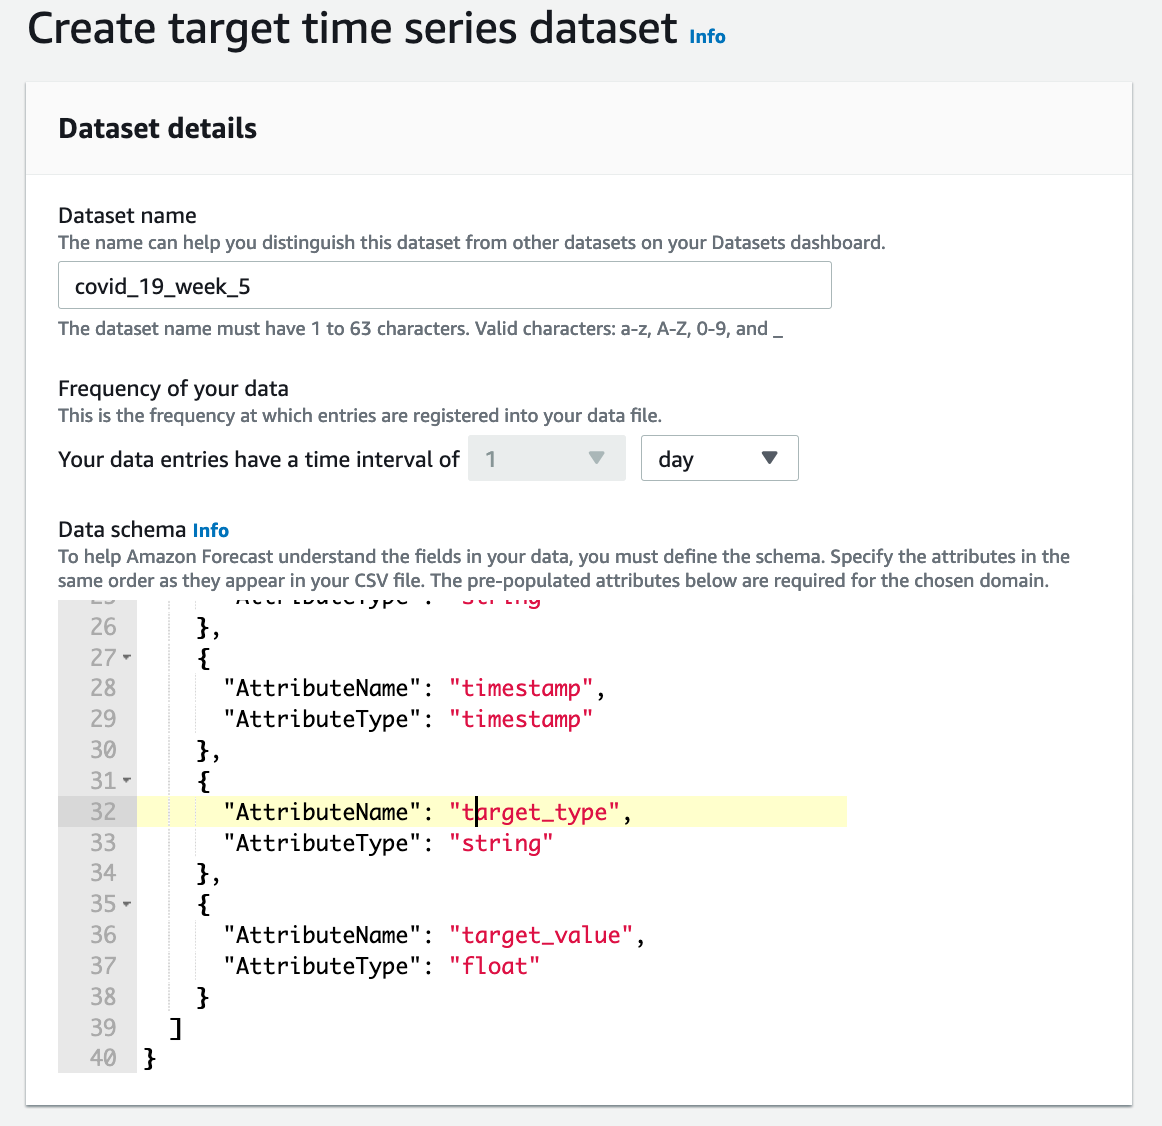
- Creating Target time series dataset
# Creating Target time series dataset
dataset_response = forecast_client.create_dataset(
    DatasetName='covid19_week5_confirmedcases_train',
    Domain='CUSTOM',
    DatasetType='TARGET_TIME_SERIES',
    DataFrequency='D',
    Schema={"Attributes": [{"AttributeName": "id", "AttributeType": "string"},
                {"AttributeName": "County", "AttributeType": "string"},
                {"AttributeName": "Province_State", "AttributeType": "string"},
                {"AttributeName": "item_id", "AttributeType": "string"},
                {"AttributeName": "Population", "AttributeType": "string"},
                {"AttributeName": "Weight", "AttributeType": "string"},
                {"AttributeName": "timestamp", "AttributeType": "timestamp"},
                {"AttributeName": "ConfirmedCases", "AttributeType": "string"},
                {"AttributeName": "target_value", "AttributeType": "float"}]
        }
)
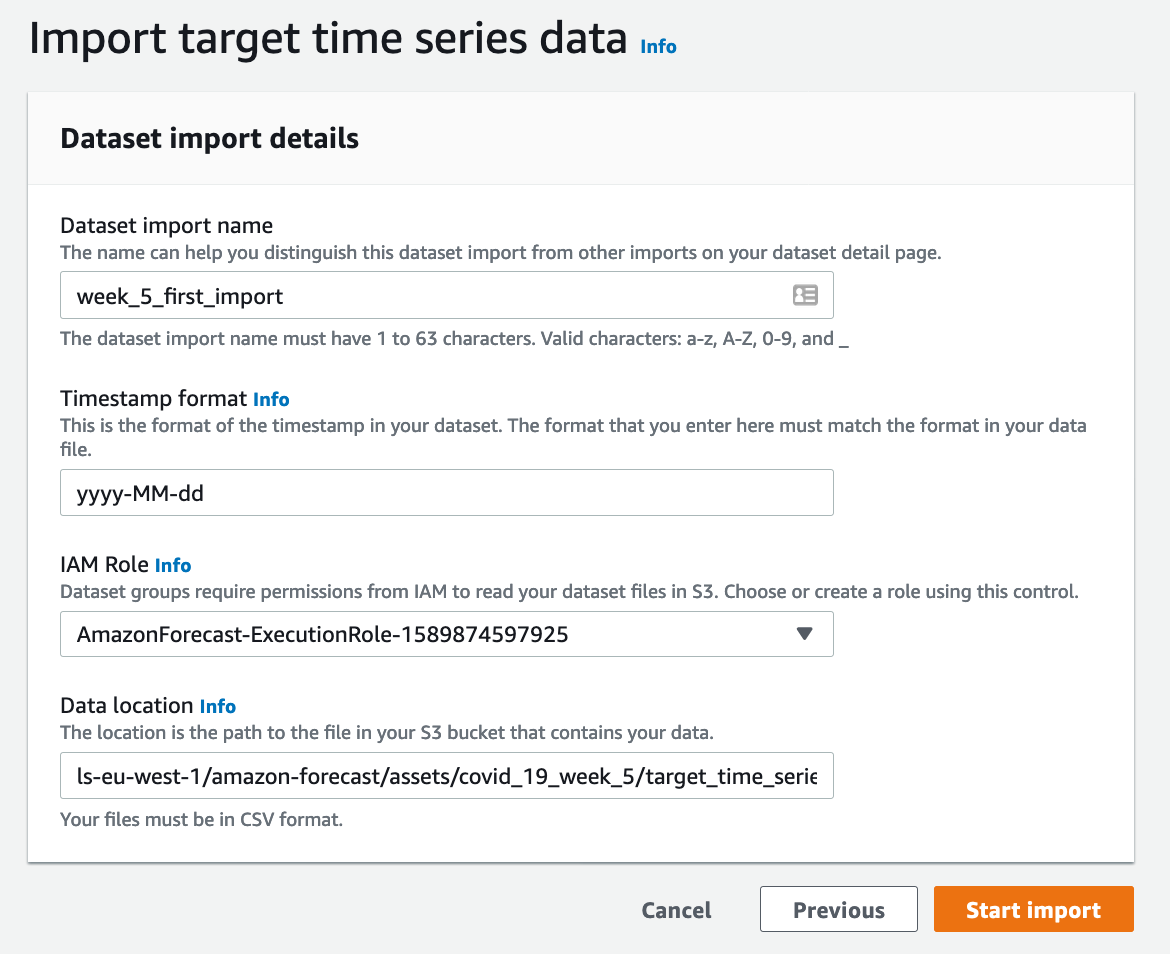
- Import data to the dataset.
We will import the data from s3 bucket into the dataset which should match to schema of it. And role should have get object permission on the bucket. For instance,
{
    "Version": "2012-10-17",
    "Statement": [
        {
            "Action": [
                "s3:ListBucket"
            ],
            "Effect": "Allow",
            "Resource": [
                "arn:aws:s3:::<bucket-name>"
            ]
        },
        {
            "Action": [
                "s3:GetObject",
            ],
            "Effect": "Allow",
            "Resource": [
                "arn:aws:s3:::<bucket-name>/*"
            ]
        }
    ]
}
# Creating dataset import job
import_job_response = forecast_client.create_dataset_import_job(
    DatasetImportJobName='week5_confirmed_cases_import',
    DatasetArn=dataset_response['DatasetArn'],
    DataSource={
        'S3Config': {
            'Path': 's3://exploring-ml-tools-eu-west-1/amazon-forecast/assets/covid_19_week_5/target_time_series/confirmedcases/',
            'RoleArn': 'arn:aws:iam::<account_id>:role/service-role/AmazonForecast-ExecutionRole-1589874597925'
        }
    },
    TimestampFormat='yyyy-MM-dd'
)
- Link dataset to dataset group.
# Update dataset group with dataset
update_ds_group_response = forecast_client.update_dataset_group(
    DatasetGroupArn=dataset_group_response['DatasetGroupArn'],
    DatasetArns=[
        dataset_response['DatasetArn']
    ]
)
- Creating predictor
We will execute command to create predictor.
# Create predictor using automl

predictor_response = forecast_client.create_predictor(
    PredictorName='covid19_confirmed_case_automl',
    ForecastHorizon=14,
    PerformAutoML=True,
    PerformHPO=False,
    InputDataConfig={
        'DatasetGroupArn': dataset_group_response['DatasetGroupArn']
    },
    FeaturizationConfig={
        'ForecastFrequency': 'D'
    }
)
This process will take time and the progress can be tracked as,
forecast_client.list_predictors(
    Filters=[
        {
            'Key': 'DatasetGroupArn',
            'Value': dataset_group_response['DatasetGroupArn'],
            'Condition': 'IS'
        }
    ]
)
- Creating forecast
We can create forecast using predictor and passing custom quantile list if required.
# Create forecast
forecast_response = forecast_client.create_forecast(
    ForecastName='covid19_automl_forecast',
    PredictorArn=predictor_response['PredictorArn'],
    ForecastTypes=[
        "0.1", "0.5", "0.9", "0.95", "0.99"
    ]
)
The progress of forecast job can be tracked as,
forecast_client.list_forecasts(
    Filters=[
        {
            'Key': 'PredictorArn',
            'Value': predictor_response['PredictorArn'],
            'Condition': 'IS'
        },
    ]
)
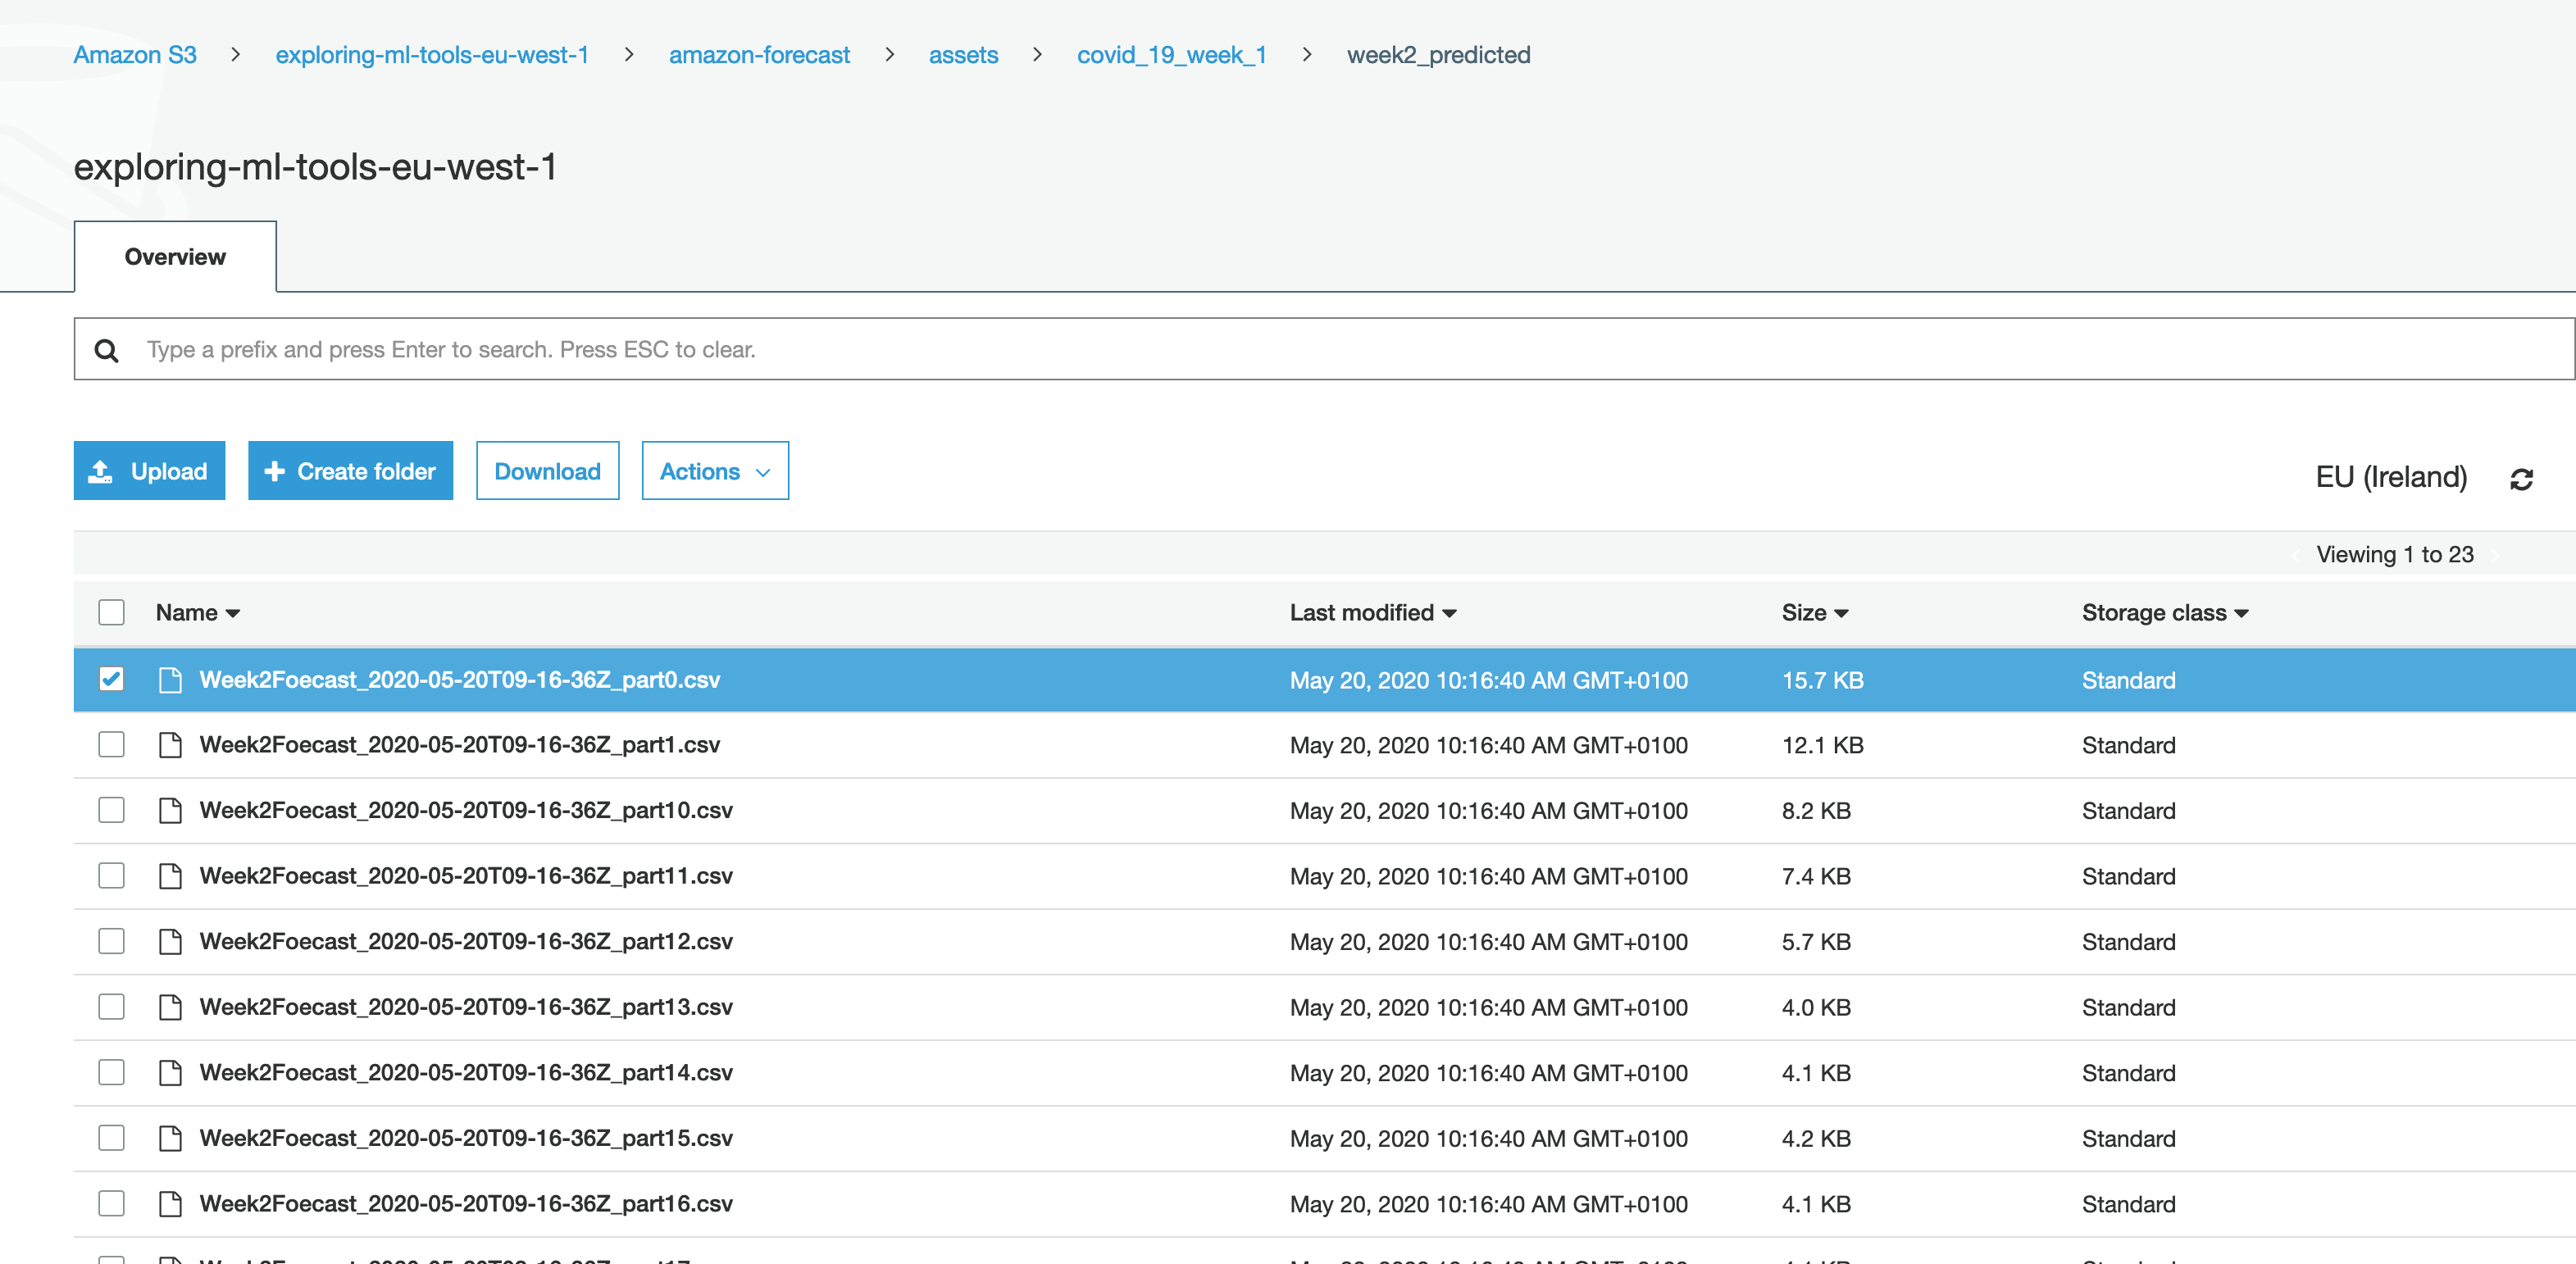
- Export the forecast data to S3 bucket
After completion of forecasting job, we can export the forecast value to S3 bucket and then utilize it based on our requirements like directly querying from Athena or loading it into data mart, etc.
# Create forecast export job
export_forecast_response = forecast_client.create_forecast_export_job(
    ForecastExportJobName='Week2Foecast',
    ForecastArn=forecast_response['ForecastArn'],
    Destination={
        'S3Config': {
            'Path': 's3://exploring-ml-tools-eu-west-1/amazon-forecast/assets/covid_19_week_5/week6_predicted',
            'RoleArn': 'arn:aws:iam::<account_id>:role/service-role/AmazonForecast-ExecutionRole-1589874597925'
        }
    }
)
Output
We can directly make a look on forecast in console as shown below. As you can see the forecast has been generated for our supplied quantile.
The output is the csv files which can be exported to s3 bucket and then utilized.
Cleanup
Following are the snippet to clean up the above created resources. As the resources are dependent on each other, the deletion should be done in order and waiter should be use.
# Delete forecast
forecast_client.delete_forecast(
    ForecastArn=forecast_response['ForecastArn']
)

# Delete predictor
forecast_client.delete_predictor(
    PredictorArn=predictor_response['PredictorArn']
)

# Delete dataset import job
forecast_client.delete_dataset_import_job(
    DatasetImportJobArn=import_job_response['DatasetImportJobArn']
)

# Delete Dataset
forecast_client.delete_dataset(
    DatasetArn=dataset_response['DatasetArn']
)

# Delete Dataset Group
# we can delete dataset group without deleting dataset
forecast_client.delete_dataset_group(
    DatasetGroupArn=dataset_group_response['DatasetGroupArn']
)
Findings
- Easy to use tool to generate forecast.
- Can auto fill the missing values.
Pricing
- No upfront cost
- Forecast are billed in unit of 1000
- Free tier:
- Generate Forecasts - Up to 10K time series forecast/month for first 2 month
- Data Storage - Up to 10/month for first 2 months
- Training hours - Up to 10 hrs/month for first 2 months
- On demand:
- Generate Forecasts - $0.60 for 1000 forecasts
- Data Storage - $0.088 per GB
- Training hours - $0.24 per hour
- Detailed example of pricing can be found and Amazon Forecast pricing page.